Posts

Showing posts with the label Stampin Up

Colour Q Challenge # 121 and Freshly Made Sketches # 19

Image
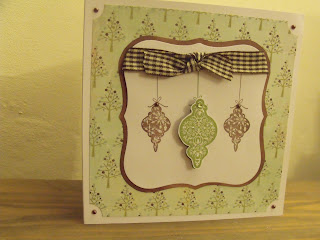
Hi folks, hope you're having a good weekend.  I can hardly believe I'm posting again so soon, but I really wanted to get this card on before it's too late. Here are another couple of challenge blogs I've been following since just before Christmas, but I haven't had enough supplies to be able to join in.  The first one is the Colour Q challenge  which as you can see, wants us to use the colours shown in the picture, put together beautifully in the skirt.  I don't have any of the Stampin Up! In Colours yet, so this is the first time I've been able to have a go.  The second challenge blog is Freshly Made Sketches.  I saw this and wondered if I could combine the two challenges. And so here is my card: First of all, I rotated the sketch, I just couldn't work it that way up! I decided to use a kraft card base, and stamped the image (sorry I can't remember the name of it) which I'd inked up in Old Olive, Real Red and More Mustard. ...

Another Valentine

Image
I've been asked to make a Valentine for a friend of mine. And this is what I made: Sadly I can't claim this was my idea, I've cased it from the awesome Darlene here .  She has even provided a video tutorial, so you can follow it step by step.  I started with a plain white 5x7 card which I distressed with Tim Holtz Old Paper distress ink, then stamped over it in Crumb Cake with my Letter stamp from Penny Black which is quite a big background stamp.  I also have a post mark stamp so I stamped that on a couple of times.  Then I made the envelope from a 4" square of paper, which I scored across each centre line and folded to make the envelope, which is slightly different to the way you'll see in the video. The hearts are cut out using various dies and punches in Rose Red, Chocolate Chip, Baja Breeze and So Saffron, and placed around the envelope, as if you've just opened it and all these hearts have flown out.  I spent a long time playing with these until I was...

A Teeny Wish

Image
Good afternoon everyone!  We have a few roof tiles missing after the storms this weekend and a small but significant hole in the roof!  Hopefully a man is coming out tomorrow to fix it for us, before we get too much more rain.  Never a dull moment round here. Poor hubby has only just gone back to work today after being off ill since Wednesday afternoon.  How do you tell someone you love them very much, but they're interrupting your crafting time?! Anyway, I managed to get this card made: The green on here is all SU! Wild Wasabi, a colour I wasn't very attracted to at first (considering I like greens generally) but the more I've used it, the more I like it.  The dsp is from the Holly Berry Bouquet range, which I really love.  It's meant to be a Christmas paper, but as you can see, this is very suited to other cards, too. The sentiment on the tag says, 'A teeny little birthday wish,' and continues inside the card with, 'sent with big hugs to a special per...

I Heart U

Image
I have been busy making Valentine cards, and I'm really enjoying it.  Here's the first one: The colour for the card and the pink heart is SU Regal Rose.  It's such a beautiful colour.  I did see a video on You Tube for how to make this, and now I can't find it, but I'll credit it as soon as I can. I've made a tag (oh for a die to do this, instead of drawing round a template every time) and brushed round the edges with Regal Rose ink.  The paper is just some from my stash that I've had for ages, but it matched perfectly with the card, so I've popped that on top of the main card stock, but with a scalloped border in the same pink.  I've popped the tag on, after adding a bow and some buttons, then added the hearts. The large one has been cut out with my Nellie Snellen hearts die, stamped with my Penny Black heart stamp, sponged over the whole thing with Versamark (glue) ink, sprinkled with clear embossing powder and heated.  This is propped up on st...

Vintage Vogue

Image
I just want to share this lovely card with you today, so I can make a note of what we used.  And please don't think I mean it's a lovely card because I made it , as this is one that we made at craft group just before Christmas, so the original idea was not mine. We used Bravo Burgundy and Old Olive inks to stamp the beautiful flowers and foliage from the Vintage Vogue (SU!) stamp set.  We ran the white section through a cuttlebug with a polka dot embossing folder, added the striped dsp and then made the topper, as you can see, with the pretty white flower in the centre of the biggest stamped image.  I made mine slightly lower down than it should have been, so didn't add the sentiment provided, as it was a bit too big, so I added the 'Just For You' when I got home, using my Stamp-a-ma-jig for accuracy, which meant I didn't have to worry that I might get it in the wrong place. I've had a very strange crafting week, where everything I pick up I seem to drop,...

Trendy Trees

Image
Hello dear Blog friends!  I hope you've had a lovely Christmas.  Was Santa good to you?  Did you get crafting stuff?  I am thrilled because I got a set of all the Stampin Up! cardstock, the stamp set called Trendy Trees, and the Funky Forest Wheel.  I spent most of Boxing Day playing with everything, and sorting the cardstock into separate packs.  I found it a bit tricky with the Neutrals set, as some of them are very similar, but I think I've got it right. I made this card as a thankyou to some friends who had a party just before Christmas.  I know I could have been quite adventurous with it, but decided to start off as simply as possible. Even hubby was impressed with the quality of the stamping.  This is the reason I bought my Stamp-a-ma-jig.  I can't tell you how satisfying it is to stamp the branches in green then stamp the trunk in brown, exactly where it needs to be.  You see things like this on other blogs and can't ...

Tree Trimmings

Image
Hello blog friends!  I realise I haven't posted for a few days, but it's been so hectic here.  I can't complain as I've been out for two Christmas lunches and two Christmas parties!  I am sooooo tired! I just wanted to show you the card I made for my craft group friends: The stamps are a brilliant set from Stampin Up! called Tree Trimmings.  You can't see it very well in the photo, but I've stamped each bauble and heat embossed them, just with clear embossing powder to add a bit of shine, but then I've added glitter with my Quickie Glue Pen, so the ornaments sparkle beautifully.  I've added some tiny gems to the top of each bauble (from Wild Orchid Crafts.  Note to self - order some more, they're fabulous!) The background paper is MME Snowed In, and the colours match my inks perfectly.  I was so pleased as it was complete chance.  I stamped the baubles, then started hunting round for paper so was delighted to see how well these went together. I...

One Of A Kind

Image
Hello all, I hope it's not too wet and windy where you are.  I'm not keen if I have to be outside, but don't mind snuggling up in front of the fire with a good book, or some cross stitch and a cat on my lap.  I am feeling flushed with success as I'm pretty sure we've done all the Christmas shopping today, so now I have the mammoth task of wrapping everything and making tags! Here's a card I'd like to share with you today: This card is unique because the white and blue dotty paper is my last ever piece of the Craftwork Cards vintage range.  It was perfect for this card.  I've cut the scalloped circle and trapped a die cut snowflake inside vellum and added it to the vertical strip.  The snowflake top left is Perfect Plum and the scalloped circle is Rose Red, two beautiful Stampin Up! colours.  The sentiment is from Craftwork Cards, too.  I was thrilled to be able to die cut a little circle, punch two small holes in it and make my own button.  It...

Take Flight

Image
Hello all, I hope you're well and getting plenty of time to indulge your passion for crafting!  I would like to say a warm welcome to my new followers.  I am thrilled and delighted that you have decided to come along on my journey of discovery into paper crafting with me. Here is my offering for today: I have used a 5x7" card blank.  I've cut sections of glossy card, stamped them with the bird from Special Blessings, and a swirl stamp in Versamark ink and heat embossed them in white embossing powder. Then I've got the brayer out and inked the sections up with Tim Holtz Shabby Shutters ink (but I think it would look nice in Baja Breeze or Marina Mist, too).   I've backed them onto bazzil card.  I'm sorry, I don't know the colour, but it's almost gold.  I added the die cut flower and the buttons, which went really well.  The sentiment, 'Take Flight' is computer generated.  I'm very pleased with the result, and hope my friend likes i...

Going Dotty

Image
I can't believe how quickly this week's gone by, and have only just realised that I haven't posted on Wednesday like I normally would.  I have been having fun with my Dot Dot Dot stamp.  I am so glad I got the Stamp-a-ma-jig at the same time!  Check this out: Over at the Less is More blog a couple of weeks ago they had a challenge using red and orange.  Loads of people said they didn't like orange.  I was really surprised as I love using orange, as I think this card shows! Do you have an 'oddments' box where you make a topper or something and then decide it's not quite right for your project but keep it anyway as you know you'll find the perfect use for it one day?  I made this little topper a year ago, and just thought it was cute, so I kept it in my box.  I pulled it out when I made this, and realised it was the perfect thing. Then I left it for a whole day as I felt it needed a seniment but couldn't decide where to put it.  I felt I'd ra...

Special Blessings

Image
I'd like you to meet the card I made that made me take the plunge with Stampin Up!: This beautiful dove is from a stamp set called 'Special Blessings.'  As soon as I saw it I knew I had to have it and I bought it in the nick of time before it retired.  It comes with a cross in the same design and some sentiments regarding baptisms and weddings.  The cross would be beautiful for a sympathy card and for Easter. I'd seen this card in a book by Kimber McGray and it's another one of those that took me a month to collect everything together so I could make it. I've run the white cardstock through my Bigshot with a polka dot embossing folder, then stamped the dove and the polka dots on the kraft card.  I didn't think it was very bright so I heat embossed it with white embossing powder and was very pleased with the result.  The ribbon was a bit of a bargain in Derby market, as it was only 19p a metre.  I decided to splash out (the last of the big spenders!)...

Card for Richard

Image
Hello all, I hope you've had a good weekend, and have had a chance to get into your crafting area or maybe even been to an exhibition.  I would have loved to have been at the Doncaster Dome, but I'm afraid horsey business took precedence this weekend.  I've still been busy though.  This is the latest card I made for one member of our Bible Study group: Everything on here is from Stampin Up! and it was a joy to make.  We tore a piece of scrap paper with a jagged edge, then taped it in place about two-thirds over to the left hand side, covering up the rest of the card blank.  Then we sponged the revealed area with Old Olive ink.  We kept the scrap paper in place while we stamped the leaves in Early Espresso.  I wasn't too sure about these leaves in the catalogue, but they make a striking image when you use them, so these may well go on my shopping list. Next we stamped the tree in Old Olive, but used an Early Espresso pen just to dab ink randomly on t...

Time For Cake

Image
I am a big fan of all things involving cake, so card making is no exception.  I decided it was time to pull out one of my favourite stamps for the card I made yesterday: Apologies for the photo quality as I'd put this card in a bag before realising I hadn't photographed it.  I can't take it out again without ruining the label on the back, so I had to take a picture in situ.  I had a bit of a saga with this card, as the paper I really wanted to use is by Papertrey Ink.  The whole paper pack only cost $8.  That would have been fine, but the delivery charge was $37!  That's a bit of a no-no, isn't it?  Even for me!  I really don't understand why shipping is so expensive, or why they don't get a distributor in the UK, as their papers and stamps would be very popular here.  Hey-ho!  So I started searching for another paper, and I'm delighted to say I found this paper from October Afternoon.  They never let me down, do they?...

Cheeky Monkey

Image
Well we are back to cold, windy weather, it seems.  Never mind, more opportunity to sit at my desk and make something.  Although, the card I'm going to show you today wasn't made at home, it was made at craft class last week.  Take a look: This stamp set is called Fox and Friends and it's in the new Stampin Up catalogue.  We cut four squares of designer paper (I can't remember the exact colours, except I think the lion is Cajun Craze and the whale is Night of Navy) and embossed them with the Square Lattice embossing folder (which I am going to have to buy!) and stamped the images onto Whisper White card and cut out with a scallop circle, as you can see.  It was a wonderful opportunity to use stamps I wouldn't normally use.  I am so enjoying going to this craft class, I am excited all day Wednesday, waiting for 6.30 to come.  We are doing a mix of Christmas cards and other cards.  We made a cute little box this week, which I'll try to show you s...

Pretty Pretty

Image
It doesn't take much to make me happy.  A new set of stamps is guaranteed to do the trick.  I've been playing with my Clearly For You set from Stampin Up!  This is what I've made: This card makes such good use of all the stamps in the set.  I've used my Marina Mist card stock and ink again.  I am using a lot of 5"x7" cardstock lately.  It's not as big as A5 and I really love it.  Here's a close-up of the little birds.  Aren't they cute?  I love birds on cards anyway, but these are so sweet.  This is my flower.  I used my Marianne Designs die, which I love, but cut a normal circle out and inked it, then added a gem for the centre.  I am so pleased with the results. It's been a busy week, but I've made quite a few cards, so hopefully I'll get some time over the weekend to put a few more on for you. Thanks for dropping by. Jane xx

Clearly For You

Image
Hello there folks!  Well the wind has died down so I'm off outside in a minute (to clear up the debris!) but before I do I thought I'd show you a card I made on Monday. This card is very similar to the one in the Stampin Up! minibook.  I've got the stamps and couldn't wait to have a go.  I got quite nervous as I haven't got much card, only two pieces in each colour, and didn't want to ruin it, but plunged right in. First I embossed the top of the card with a polka dot embossing folder, which you can't really see.  Then I stamped the cute little birds inside one of my Four Frames stamps and set it to one side.  Next I stamped the strip with my Penny Black letter stamp and inked it with Tim Holtz Old Paper distress ink.  Then I drew an oval on a piece of white card and tore it out.  I inked round the edges with Broken China ink.  I drew just inside it on my card and then stamped the blackberry stamp in Marina Mist which is the same colou...

Stampin Up!

Image
Well I went to the new craft class on Wednesday night, and had a fantastic time.  We made three things, so here they are: The first one is this lovely calendar page for September.  They've made one for each month this year apparently.  I'm not sure if the stamp is by Stampin Up! (SU from now on, I think!) but the paper certainly is, and the punch design at the top is Martha Stewart.  I've never used one of hers before and was really impressed. Here's a card we made: Can you tell it's SU, just from looking at it?  It's dawned on me that they don't really use white cardstock and they don't stamp in black and colour it in like most other companies.  They stamp in the coloured ink that works best with the image and use a wide range of coloured card stock.  We used a ribbler to get the corrugated effect on the card, it was really easy.  And finally: The photo doesn't show the glitter on this card really, it's very pretty.  The card colour i...