Posts

Showing posts from September, 2012

Dynamic Duos No 21

Image
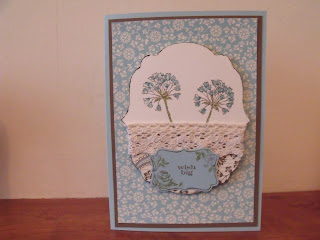
Oh my, two posts in one day, what is going on?!  This is how it began: I keep seeing cards using the triple time stamping technique.  Dawn Olchefske has a fabulous video here .  I plunged in with a card for one of the residents, have a look: The colours here are Early Espresso and Crumb Cake. BUT then I saw this week's Dynamic Duos blog challenge, which is to use Always Artichoke and Certainly Celery.  I was so struck by the cards made by the design team, as I have never used my Always Artichoke card stock.  I instantly knew what I wanted to do, and here it is: The overall card is only 4 1/4" x 5 1/2" but it fits in a C6 envelope.  You can see the technique for yourself on the video, it's very clever.  I have used a flourish background stamp in Certainly Celery, then the flower from the Fresh Vintage stamp set, and stacked the Whisper White cards one on top of the other and stamped away, first the sentiment, then the flourish, then the flo...
Cagey Card

Image
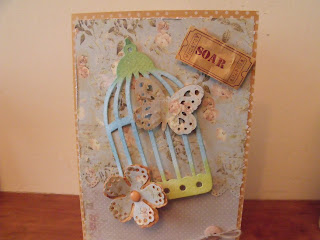
My darling hubby bought me a subscription to Simply Cards and Papercraft magazine as a Christmas present, then not long after that I went off it (daren't tell hubby!) so I've decided I have to make the best of it and see what projects I can make out of it each month.  This is what I've made this time: I've basically cased the card from the magazine, as the original had a fairy on it, which I just couldn't do (interesting technique though it was!) but I liked the colour scheme very much, and the fact that it uses this birdcage die from Tim Holtz, which obviously I have in my possession! Let's start from the bottom and work upwards: Layer 1: 5"x7" more mustard cardstock, stamped around the edge with the Dot Dot Dot background stamp in white ink. Layer 2: Papers from the Prima Botanical paper stack that was free with the magazine.  The edges were distressed.  You can't really see, but the bottom edge of the top paper is cut along with the M...

Mashing It Up

Image
I've been following The Friday Mashup blog for ages and love the challenges they put on, different to your average sketch/colour blog.  I keep seeing starburst cards around and have been dying to have a go, without a clue how to do it, when suddenly, this is this week's Mashup challenge: Make a project with the "Sketch". Or Make a project with the "Starburst technique". Or "Mash it Up" and create a project using the "Sketch and Starburst Technique". I'm not sure if they'd say I've followed the sketch, as my circle is on the other side, but here is my card: I don't seem to have followed the tutorial most people have used, I've followed this brilliant video by Andrea Walford.  The video makes it really clear how to do it, and there's a template to download and cut out. I would say, if you're going to make it, give yourself plenty of time and spend most of it making the decision about what colour sch...

Spice Up Your Life!

Image
I've made a little card, with one of my all-time favourite stamp sets.  Come and have a look: Layer 1: 5"x7" pool party cardstock.  Layer 2: soft suede. Layer 3: a beautiful design from the Spice Cake dsp.  I am going to use every inch of this fabulous paper! Layer 4: I cut a large size piece of card using the Labels Collection Framelits, then stamped my fave image from the Simply Soft set in Wild Wasabi.  As you probably know, it's a 2-stage set, so I inked up the inside in pool party and stamped away.  I will never get tired of doing this! I added a section of paper from another sheet of the dsp, popped lace on, then added a sentiment using my Four Frames stamps and punch. Just a quick post today as I'm off out shopping. Happy crafting, folks! Jane xx

Postcards From The Edge

Image
I am challenging myself to make a scrapbook page once a month, as I am  stacking up photos that I love and not doing anything with them. So without further ado, here's is this month's project: Yes, okay, most people scrapbook their daughter's wedding, or the grandchildren or their exotic holiday, but I, well, I scrapbook my horse.  And if you knew him, you'd know why. I saw this paper, called 'Cambridge' by Bo Bunny, back in 2011 and fell in love with it.  It's taken me all this time to get round to buying it, though, so I'm really glad it was still in stock. I go through a strange process every time I do a layout.  I sit there and get loads of stuff out that either matches or I think fits my theme.  Then I sit and stare at it for two hours (I kid you not!) Then I go to bed and dream about it all night. Then I get up and spend another 2-3 hours putting my dreams on paper (and finding that half of them don't work!)  This is why there is...

Twitterpated

Image
I've recently sent two cards off to recipients before I'd taken photographs of them, what a fool!  One of them, in particular, was really nice, so I'm quite cross about it.  I've decided from now on I must take a photo as soon as the card is done and write a blog post for it while all the details are still fresh in my mind.  This is a project I did a little while ago, too.  Firstly, the card: I'm starting to really understand how SU! works for me.  I fall in love with a set of dsp, then I go and buy the plain cardstock that goes with it, some gorgeous stamps (and maybe dies or punches) and away I go and create!  This paper,  is called Twitterpated, and it's one of the most beautiful sets of paper I've ever used.  The blue cardstock is baja breeze, one of my fave colours, and the ribbon (oh the ribbon!) is ready pleated in blushing bride, what a fabulous product that turned out to be!   I've used the Apothecary Art stamp set and ...

Let's Talk Layers

Image
I've recently made another card for one of the residents.  She is 91 tomorrow.  This card caused me some problems.  The first problem is that the recipient is blind.  So my first instinct was to just go and buy a musical card.  Except that this lady is also deaf.  So that's no good. So then I thought: She needs a card that's interesting to touch.  So this is what I made: It's a 6x6" white card base.  The second layer is some Pretty In Pink cardstock, embossed using a flowery embossing folder.  Next is a layer of white textured card.  Then there is the top square which is glossy card.  I've embossed the flower (from Little Claire's Designs) in white (kraft) ink, then added white embossing powder and heated it.  Then I've gone over it with Pretty In Pink ink, straight from the little cube.  I am thrilled that it worked.  I added a little smudge of a darker pink in the centre with a sponge dauber. The shape of th...

Card For Joan

Image
I knew  it was Joan's birthday coming up so I decided to ask her about it.  She said she would be 80, which is fine, but later in the conversation she said she was born in 1922.  Now maths is not my strong point, but I lay in bed that night going over and over it and still coming up with 90!  So I went in the next day and my manager asked if I could make a 90th birthday card for Joan.  Phew, my maths isn't that bad then.  I'm already at the stage where I'm beginning to forget how old I am, so I totally understand! I knew straight away what I wanted to make, and here it is: This is the first time I've cut into this beautiful sheet of 12x12" dsp from the Everyday Enchantment set. Technically the red on the paper is Poppy Parade (goodbye sweet love, sob!) but I stamped the image (from Fresh Vintage)  in Real Red and it looks a complete match.  The 'white' is actually Very Vanilla, which is the background for the dsp, so I've carried that through...