Posts

Showing posts from October, 2011

Card For Sketch Saturday Challenge

Image
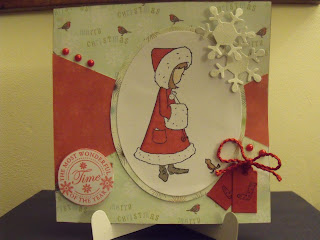
I really liked the sketch over at Sketch Saturday this week, and again I've decided to use it to get a Christmas card done.  Here we are: The sketch is quite unusual and I really had to think about how to do the bit in the middle that's in red.  In the end I cut it out with a little tiny join in the middle which you can't see as it's under the stamped image.  I followed the sketch very closely and instead of getting things ready beforehand I just decided to go with the flow.  Each time I saw an element on the sketch I decided to add something to my card to represent it, hence the snowflakes and the two little tags with stockings stamped on.  I just felt it worked really well that the little girl is looking at a robin and the backing papers have robins on.  My favourite bit was making the snowflakes.  I wiped a Versamark ink pad all over a big section of card, then sprinkled white embossing powder all over it.  I heated the powder until it set, then cut snowflakes out

Card for Richard

Image
Hello all, I hope you've had a good weekend, and have had a chance to get into your crafting area or maybe even been to an exhibition.  I would have loved to have been at the Doncaster Dome, but I'm afraid horsey business took precedence this weekend.  I've still been busy though.  This is the latest card I made for one member of our Bible Study group: Everything on here is from Stampin Up! and it was a joy to make.  We tore a piece of scrap paper with a jagged edge, then taped it in place about two-thirds over to the left hand side, covering up the rest of the card blank.  Then we sponged the revealed area with Old Olive ink.  We kept the scrap paper in place while we stamped the leaves in Early Espresso.  I wasn't too sure about these leaves in the catalogue, but they make a striking image when you use them, so these may well go on my shopping list. Next we stamped the tree in Old Olive, but used an Early Espresso pen just to dab ink randomly on the body of the tre

Love That Card

Image
I've been very busy making cards, alternating between Christmas cards and cards for other occasions.  This is a card I've made for a friend: I saw the instructions for making this card in Cardmaking and Papercraft magazine over a year ago.  I was very drawn to it and have kept it all this time.  It's only now I've got everything I need to make it.  I've embossed a piece of white card, then used a pink Memento ink pad on it.  The card is purple plum from Stampin Up.  As you can see, I've torn it at an angle along the bottom and curled it up.  I've coloured what was white organza ribbon with an aubergine promarker and stamped the flourish and flower at the bottom of the card.  I've put a gem on either end to add a little bling.  I've stamped an LOTV circular sentiment and backed it with a scalloped circle in the same purple plum card. This card was really fun to make, there was so much to do, but I really enjoyed it. I love these colours together

Sympathy 2

Image
Good morning, everyone!  It's blowing a gale out there and I have several jobs to do outside.  I've decided to fortify myself with a cup of coffee first, so I thought I'd pop a post on while I've got ten minutes. This is the second sympathy card I made for our farriers: As you can see, I decided to keep it very simple.  The stamp is from Penny Black. I always think of poppies for remembrance, but decided not to be conventional and chose blue to colour it.  I've painted it with Aquamarkers, straight onto the card.  Nerve wracking, but surprisingly easy.  I mixed my blue and green to get the green for the leaves.  I'm amazed that it stays so consistent and doesn't show through the card.  The sentiment is computer generated and backed with a border just coloured with Cornflower Blue Promarker. For some reason I'm losing the ability to use sketches to make cards.  I've no idea why this is, except that my style is changing and I'm having a lot mor

Card For Pam

Image
As you may know, if you're a regular follower, I made a commitment at the beginning of the year to make a birthday card for everyone in our Bible Study group so that everyone could sign it.  October has been a busy month, as it turns out, with three birthdays.  This is what I made for one lovely person: For ages I've been wanting to make a card where I had a flower in the bottom corner, with a leaf going horizontally and vertically, but for some reason it's taken me ages to work out what to use.  This time it was MME that came to the rescue, with my lovely Wild Asparagus papers, and this gorgeous die cut flower.  I just stacked one on top of the other, and finished off with a fabric brad from the same range. I cut a square of paper, 15x15cm, distressed the edges and added some brown ink.  I cut an oval of white cardstock and distressed it all over before stamping the sentiment and the butterfly, both in Memento brown ink.  The stamps are from the Flourishes stamp set by

Santa's Midnight Snack

Image
Hi folks! There's a really good sketch this week at Sketch Saturday , and I'm finding them really useful for helping me with Christmas card layouts, (thankyou girls!) so I've decided to enter this one: I bought this stamp at the very end of my card making last year and fell in love with it, and the ticket sentiment too, as I'd never seen anything like it before in my life.  It's so thrilling to still own them a year on, if you know what I mean, going through my Christmas stash is like greeting old friends.  I was even more delighted to see how well the SU colours Baja Breeze and Cherry Cobbler go together, and these designer papers are a match made in heaven.  Each one of them co-ordinates beautifully, even though they're not SU (hope I don't get into trouble for saying that, as a fact's a fact!)  The piece of Cherry Cobbler card has been embossed with a Christmas snowflake embossing folder.  Here is a close-up of the Santa image: Look at him with h

Sympathy Card

Image
I was very sad to hear that a young man had died, who is very good friends with our farrier.  Our farrier asked if I could make some sympathy cards for them to give to the family, which is what I've been working on over the weekend.  I have made one or two sympathy cards before, but was very affected as I make these and my heart goes out to the recipients. The first one I made was this one: I decided to keep things as simple as possible, so stamped the image in black and heat embossed it with clear embossing powder, then stamped the butterfly and left it just in ink, so it looks quite different.  This was all done on a square cut out with a Nestabilities die, then layered on black.  The sentiment is computer generated.  I'll show you another one tomorrow.  I'm off to make my niece a birthday card, to cheer myself up! Thanks for dropping in today, your input is greatly appreciated. Jane xx

This Week's Christmas Card

Image
I am on track with the Christmas card making.  Here is the card I've made for a dear friend this week: Unllike yesterday's card, this one took hours to make.  I am having real problems getting stamps to stick on my acrylic block lately.  This one kept falling off before I could print it, then, despite my best efforts, part of the image was missing.  Grrr!  There's nothing so frustrating, is there?  Especially as I was using my beautiful smooth card to stamp onto.  I ended up wasting nearly a whole sheet.   I think you'll agree, it is a cute image though.  I first saw this last Christmas and really wanted it, but have actually only ordered it a couple of weeks ago. I tried to follow a sketch here, but it's not similar enough, so I'll have to pass on that one for this week.  I meant to put snow round the bottom, but forgot all about it!  It's sealed in the envelope now, so it's too late. Recipe: Cardbase: white card stock 6x6 DSP: Forever Christmas

Time For Cake

Image
I am a big fan of all things involving cake, so card making is no exception.  I decided it was time to pull out one of my favourite stamps for the card I made yesterday: Apologies for the photo quality as I'd put this card in a bag before realising I hadn't photographed it.  I can't take it out again without ruining the label on the back, so I had to take a picture in situ.  I had a bit of a saga with this card, as the paper I really wanted to use is by Papertrey Ink.  The whole paper pack only cost $8.  That would have been fine, but the delivery charge was $37!  That's a bit of a no-no, isn't it?  Even for me!  I really don't understand why shipping is so expensive, or why they don't get a distributor in the UK, as their papers and stamps would be very popular here.  Hey-ho!  So I started searching for another paper, and I'm delighted to say I found this paper from October Afternoon.  They never let me down, do they?  The flowers are an off-white a

Cheeky Monkey

Image
Well we are back to cold, windy weather, it seems.  Never mind, more opportunity to sit at my desk and make something.  Although, the card I'm going to show you today wasn't made at home, it was made at craft class last week.  Take a look: This stamp set is called Fox and Friends and it's in the new Stampin Up catalogue.  We cut four squares of designer paper (I can't remember the exact colours, except I think the lion is Cajun Craze and the whale is Night of Navy) and embossed them with the Square Lattice embossing folder (which I am going to have to buy!) and stamped the images onto Whisper White card and cut out with a scallop circle, as you can see.  It was a wonderful opportunity to use stamps I wouldn't normally use.  I am so enjoying going to this craft class, I am excited all day Wednesday, waiting for 6.30 to come.  We are doing a mix of Christmas cards and other cards.  We made a cute little box this week, which I'll try to show you soon. Have a gr