Posts

Showing posts from August, 2011

Love In A Cold Climate

Image
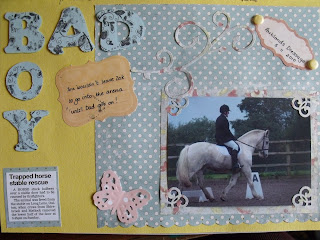
I have finished my first scrapbook with pictures of Barnaby.  I so enjoyed making this: This photo was taken last December of Barnaby and Zak in the snow.  Alll these papers are by October Afternoon and they have a really vintage feel.  I felt like my grandmother when I was cutting these up!  How sad is that?  I made the little pocket for the tag, which has loads of words regarding memories, including the quote that I used at the bottom which says, 'God gave us memories that we might have roses in December.'  I've distressed it with ink and used my distressing tool round the edges.  This little gadget is my new best friend.  I've called it 'Love In A Cold Climate' for obvious reasons, but also because that's the title of the book I was reading at the time of making this, plus the colour scheme matched the colour of the book.  Surreal.  Lots going on here, but I really like it.  I'm going to be doing a lot of scrapbooking over the winter I think. I hav

Have Your Cake...

Image
I've spent the morning making a card for Sketch Saturday Challenge.  I've been so busy I haven't had a chance to do a challenge for a couple of weeks.  The stamp I've used is from Quick Cards magazine.  I've been looking for a stamp with a cake stand on it for ages, so jumped at this one.  The papers are all from the Tea House set by Dovecraft.  They're so pretty, most have something to do with tea and cake.  I've used some pretty pink ric rac at the top and bottom and added a sentiment from LOTV.  All the images and papers are backed onto pearlescent pink card, which is lovely too. Thanks for dropping by today, I'm off outside to enjoy the sunshine. Blessings everyone! Jane xx

Wedding Card - Lady In Red

Image
Just a quickie today. I've been working on a card for a friend, and here it is: I asked her if she knew anything at all about the bride's colour scheme, and she said, "No, not really, but it's going to Hong Kong and red is a lucky colour there, so if you could put some red in, that would be good!"  And so I did. I absolutely adore this image from LOTV.  It's very delicate but was a pleasure to colour in as I've just bought a set of fine point tips for my Promarkers.  They are amazing.  You just pop them over the top of your regular Promarker and start colouring.  If you're swapping from one pen to another like I do, you need a piece of scrap paper by your side to make sure the ink from one pen has run out and the new ink has come through to the nib and then you're ready to carry on colouring.  You can colour the tiniest of areas perfectly, hence the flowers in the bride's bouquet and the flowers in her hair are immaculately coloured.  These

Bad Boy

Image
This is a page I've just finished for last November when we took Barnaby to a dressage competition.  He was so naughty in the end I couldn't ride him and hubby had to do it! Here's the page. The letters that say 'Bad Boy' are chipboard.  They are really brightly coloured, so I covered them in plain blue paper, then stamped on them with a floral stamp, which is much more what I had in mind.  The newspaper cutting bottom left is from when Barnaby got stuck over his stable door and had to be rescued by the fire brigade.  I found out later we'd been in the paper and managed  to track down the cutting.  It seemed  to fit with this page of equine naughtiness! I have only done this in a normal scrapook and have one more to go before I can start using proper 12" x 12" paper, which I'm really looking forward to, but using a normal book has meant I've had to be quite inventive.  I've also noticed I go into a slightly different brain mode when I

Clean and Simple - first time ever!

Image
First of all, I just want to say a massive thankyou to Margaret at Christian Chick Crafts as I've won her candy!  I am thrilled.  I got a big package in the post and wondered what on earth it was, as I didn't realise I'd won at the time.  I've got the most amazing stuff, look here: I kept putting my hand in the envelope and it just kept on giving!  There are beautiful stamps and every kind of embellishment known to man, plus glitter, and some bottle tops, which are something I've been dying to use, so I am delighted.  It'll keep me busy for months.  Thankyou so much, Margaret.  Isn't blogging exciting?  You never know what's going to happen next... Finally, I've had a go at a clean and simple card.  As you know, the problem with Promarkers is that they go through whatever cardstock you use and can be seen on the other side.  So there is no way you can stamp directly onto your card and colour it in. So I thought I'd risk ruining one card bl

Bits and Bobs

Image
Goodness me, it's been a hectic few days!  Hubby has been off work ill, which has made it very difficult to craft and blog, but he's feeling much better and gone back to work today, so it's all systems go!  I did manage to make this yesterday though: Another card without a stamp, you'll notice.  I've had these chipboards since last year and didn't really know what to do with them.  Keeping to my golden rule of  'never throw anything away' has been good because, on Saturday I found a book called '175 Fresh Card Ideas' by Kimber McGray in an Oxfam shop.  It is a brilliant book in which she uses very few stamps and more chipboard, die cut flowers etc, and it's very inspiring.  It was only published last year, so it's very up-to-date and I actually recognise some of the papers she's used. So for this card: I started off with basic white cardstock, but it looked too bright and clean for my purposes, so I distressed it with Tim Holtz Old

Prima Papers

Image
Do you ever have a situation where you buy some papers for a particular project, then don't know what to do with the rest of the pad?  I've done this recently because I've bought some Prima Papers called 'Melody' which I used one sheet of for the ruby wedding anniversary cards I made a little while back.  The papers are all works of art, but I haven't had a clue what to do with them.  Then on Wednesday I was thumbing through one of my old magazines and admiring some cards in there.  After a few minutes I twigged that the papers in the article were the very same ones I own. So I leapt to my desk and made this: I used my white jelly-roll pen to do all the stitching by hand.  It's the first time I've had the nerve to do it and I'm really pleased with the result.  Not a stamp in sight, I'm afraid, which is unusual for me.  I'm inspired now, and hope I can do these papers justice with future creations. Now, before I go, a quick question for yo

Flower Power

Image
I've been working on this, this morning: I got the basic idea from a magazine, and used it as inspiration for this layout, but when I went into the detail, the dimensions in the magazine were wrong, so the stamped image didn't fit with a frame round it, which is why I decided to put it on at an angle.  I enjoyed making it, though, as the backing card is brayered with Tim Holtz Shabby Shutters ink (which I thought was going to be blue when I bought it, but love the colour of it now), layered up with MME papers.  I think I'll have to buy another pack of these, as they're so versatile.  The flowers were a free digi image, coloured with Promarkers and then shimmer paints.  It's meant to be a stencil, but I wasn't happy with my colouring so I cut the top flower out and stuck it back in place with sticky fixers, to give it a bit of dimension. I've been watching some very inspiring You Tube videos, so it's 'all systems go' this week. I'm off to do

Little Bear

Image
Hello all!  It's been pouring with rain for most of the day here.  What better excuse for putting the kettle on and settling down to some crafting?  I nearly had a touch of conscience and did the ironing instead, but the need to cut and stick won the day! This is what I've made: This is daringly bright for me, as you know, I love my pastels, but I decided not to be put off using these Kate Knight papers.  I have loads, as they're not really my style, but it's silly to leave them sitting there. The colour palette from these papers is vast: purple, orange, lime green, cerise, and aqua, so I was spoilt for choice when colouring the image. But what I'm really pleased with, is that this card cost me nothing to make.  Here's how: The bear is a free digital image from May Brit's Hobbyblogg, which you can find here .  She does it all the time.  How utterly generous is that?  They are beautifully drawn, too.  Hop on over, I'm sure you won't be disappoint

Bon Voyage!

Image
I've actually been so busy on the farm I've been away from my desk for a few days, so it's been lovely to sit down for an hour and create something.  Here's today's card: The paper was free with Cardmaking and Papercraft magazine (August, I think).  As soon as I saw it, I knew what I was going to do with it, and here we are.  The campervan is a digital image from Little Claire's Designs.  All I had to do was colour with my Promarkers, and Bob's your uncle!  I've put Glossy Accents on the headlamps and printed the sentiment on my computer.  It just made me think of, possibly a girl who's done her 'A' Levels and is off for a gap year before going to university. Have a great day, everyone, and thankyou so much for all your lovely comments on my previous post, you've really given me a boost, I appreciate it so much. Jane xx

A Stitch In Time

Image
I've been experimenting with aperture cards, as way back last year I made some little cross stitch cards.  Obviously at the time I didn't have a clue what I was doing, and once completed I put each one in the little card that came with it (which is a perfectly correct thing to do).  But the cards are very small, and I wouldn't buy one like that.  There's a lot of work involved, and you're never going to make any money back if you sell them. So I took one of the cross stitch pictures out and set to thinking, and this is what I came up with: So the image in the centre is cross stitched.  I've cut a piece of A3 card into a section 14cm x 42cm, scored and folded it into 3 equal square sections.  I've covered the centre piece in this red dotty paper (free from Cardmaking and Papercraft mag) and put it through the Bigshot to cut the circle out.  I've put the cross stitch in and stuck the back down, so now you have a normal card.  Now here comes the 'hap